


Parts of a Katana: What Each Part Does and Why It Matters
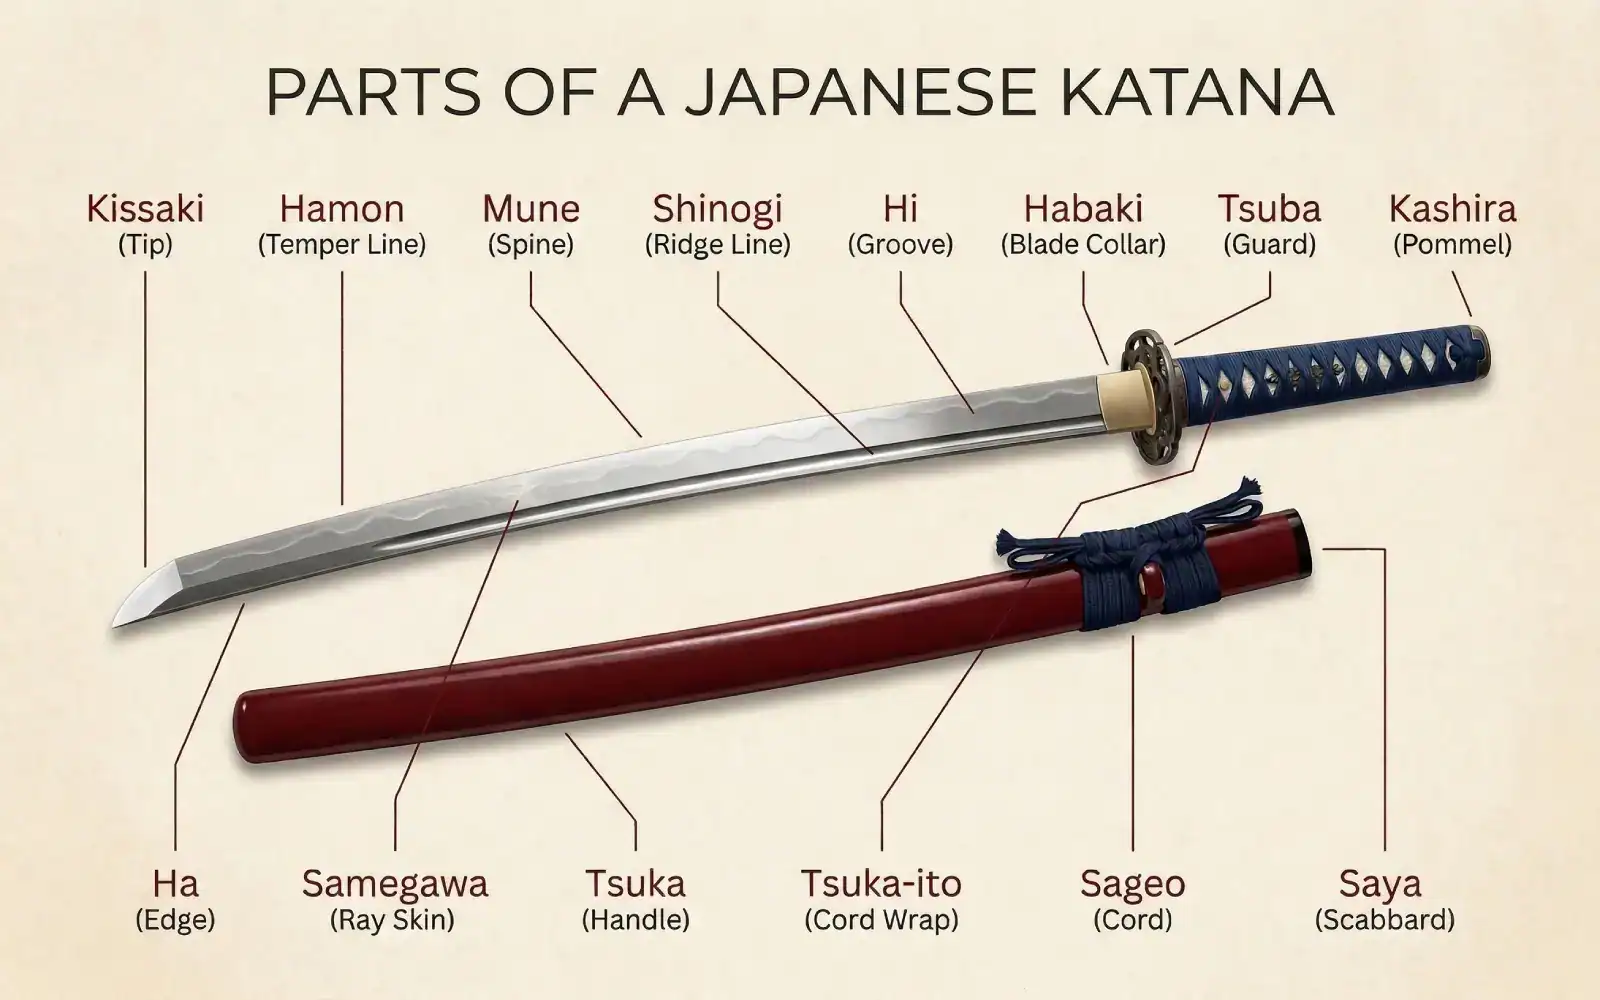
The parts of a katana include more than 20 components, each serving a specific structural or safety role. These components are typically grouped into four main zones: the blade, guard, handle, and scabbard.
Browse any katana product listing and you will see terms like “authentic hamon,” “full tang,” and “genuine samegawa.” Without knowing what these katana parts mean, it becomes difficult to judge whether a sword is a functional weapon or simply a decorative display piece.
This guide explains the major parts of a katana so you can inspect a sword with confidence, maintain it properly, and recognize quality when evaluating a blade.
Parts of a Katana at a Glance
While every katana follows the same general layout, the specific style and quality of its fittings often signal the sword’s intended use. A sword built for cutting practice will prioritize durable materials and secure construction. One built for display may focus more on visual detail.
Every major part falls into one of four groups based on its physical location on the sword.
| Location | Japanese Term | English Name | Function |
| Blade | Nagasa | Blade Length | The length of the blade measured from the base of the cutting edge to the tip. |
| Blade | Ha | Edge | The razor-sharp hardened cutting surface of the blade. |
| Blade | Mune | Spine | The unsharpened back edge that adds structural strength. |
| Blade | Kissaki | Tip | The pointed section of the blade used for thrusting. |
| Blade | Hamon | Temper Line | The visible pattern created by differential hardening. |
| Guard | Tsuba | Guard | The hand guard that protects the user’s hand and balances the sword. |
| Guard | Habaki | Blade Collar | A metal collar fitted at the base of the blade that helps secure the sword in the scabbard and stabilize the guard assembly. |
| Guard | Seppa | Spacers | Thin metal spacers placed on each side of the guard to keep the fittings tight and properly aligned. |
| Handle | Tsuka | Handle | The wooden hilt where the sword is gripped. |
| Handle | Samegawa | Ray Skin | A textured layer that improves grip and supports the handle wrap. |
| Handle | Ito | Handle Wrap | The cord wrapping around the handle that improves grip and control. |
| Handle | Mekugi | Pegs | Bamboo pins that secure the blade’s tang inside the handle. |
| Scabbard | Saya | Scabbard | The wooden sheath used to store and protect the blade. |
| Scabbard | Koiguchi | Scabbard Mouth | The reinforced opening of the scabbard where the blade enters. |
| Scabbard | Kurigata | Cord Knob | The knob on the scabbard used to attach the sageo cord. |
| Scabbard | Sageo | Cord | The cord used to secure the scabbard when worn or displayed. |
| Scabbard | Kojiri | End Cap | The protective cap at the end of the scabbard. |
Some listings also mention the nakago (tang), which is covered in the Tang and Pins section below. Once you can identify these katana components by their Japanese names, evaluating build quality becomes much easier. Terms like kissaki and tsuba refer to real structural parts found on traditional katanas.
Katana Blade Parts
The blade brings together two critical properties: hardness and flexibility. The cutting edge must be hard enough to hold a razor-sharp line, while the body of the blade needs enough resilience to absorb impact without breaking. This balance comes from how the steel is heated, shaped, and cooled during forging.

Cutting Edge, Spine, and Blade Curve
The Ha (cutting edge) is the hardened strip of steel that runs along the blade’s front. During traditional forging, the swordsmith coats the spine with a thick layer of clay while applying a much thinner layer along the edge. When the blade is quenched during hardening, the edge area cools faster and becomes harder, while the protected spine stays softer and more resilient.
This difference in hardness is why a katana can cut through cutting targets while resisting breakage on impact.
The Mune (spine) is the unsharpened back of the blade. Its thickness provides the structural backbone that supports the thinner cutting edge. If you lightly touch the spine of the blade, you can feel the flat or rounded profile that shows how the smith distributed weight.
The Ha and Mune work as a pair:
- Ha (edge): Hardened steel, holds a razor-sharp line, does the cutting
- Mune (spine): Softer steel, absorbs shock, helps prevent the blade from snapping
Two other features shape how the blade moves through a target. The Sori (curvature) allows the edge to slide through material in a drawing motion rather than chopping straight down. The Shinogi (ridge line) creates a wedge-shaped cross-section that reduces drag during a cut.
Together, sori and shinogi make the katana a slicing weapon rather than a hacking one. The specific steel and heat treatment behind these properties are covered in our guide on what katanas are made of.
Blade Tip, Hamon, and Groove
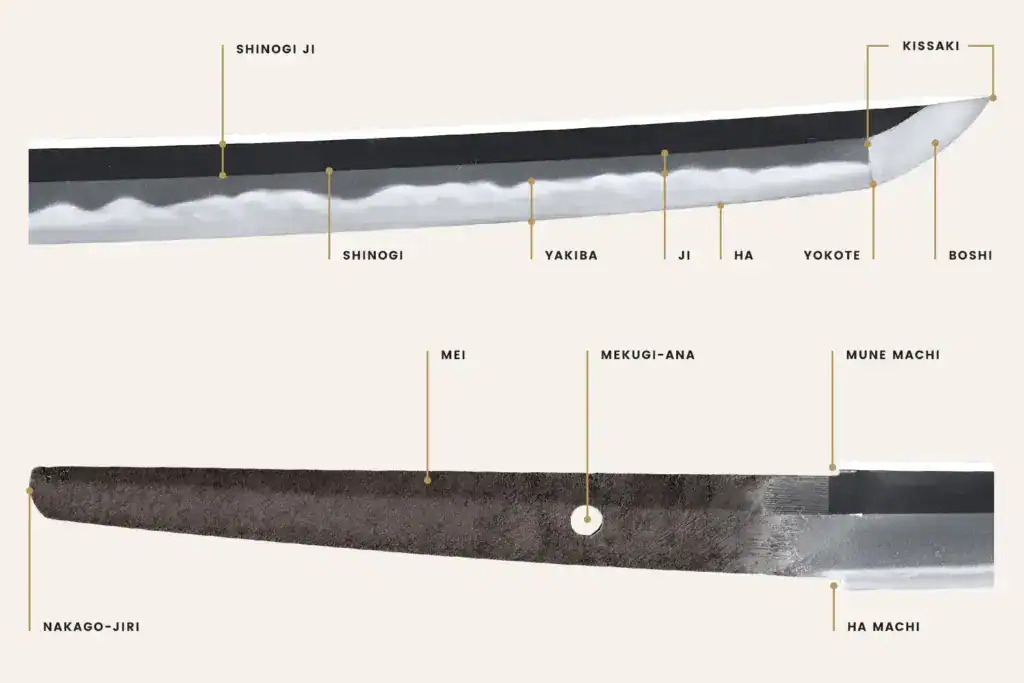
The Kissaki (tip) is the most carefully shaped area of the blade. A boundary line called the Yokote (tip transition line) marks where the blade’s geometry shifts from the main body into the tip’s own distinct profile. Kissaki come in different sizes: a longer tip (o-kissaki) offers a larger cutting surface, while a shorter tip (ko-kissaki) is commonly seen on older blade styles.
A channel carved along the flat of the blade is called the Bo-hi (groove). Its primary purpose is to reduce weight while helping maintain the blade’s rigidity. A blade with a bo-hi is typically lighter than the same blade without one.
Practitioners also use the bo-hi as a feedback tool: a properly aligned cut produces a whistling sound called tachikaze, while a misaligned cut stays silent.
The Hamon (temper line) is the wavy or patterned boundary between the hard edge and the softer spine. It forms naturally during differential clay hardening and is one of the most visually distinctive features on any katana.
Common patterns include suguha (straight), midare (irregular), and choji (clove-shaped). For a closer look at these designs and what they reveal about a blade’s quality, see our guide on what a hamon is on a katana.
Katana Guard and Collar
The Tsuba (guard) sits between the blade and the handle. It serves two purposes. First, it helps prevent your hand from sliding onto the blade and can block an opponent’s blade from sliding toward your grip. Second, it acts as a counterweight that shifts the sword’s balance point closer to the handle, making the blade easier to control during quick movements.
Tsuba come in hundreds of historical designs, from plain iron discs on battlefield swords to elaborately carved pieces featuring gold inlay.
The Habaki (blade collar) is a small metal collar fitted around the base of the blade just below the guard. It helps align the blade within the fittings and creates the friction fit that holds the sword securely inside the scabbard. Without a properly fitted habaki, the blade would rattle loose every time you moved.
Seppa (spacers) are thin metal washers that sit on either side of the tsuba. They fill any gap between the guard and the habaki on one side and the guard and the handle on the other. If a katana’s fittings rattle when you shake it gently, worn or missing seppa are often the cause.
Katana Handle Parts
The Tsuka (handle) is a layered assembly of wood, skin, cord, and metal fittings designed to give you a secure, vibration-dampened grip. Of all the parts of a katana, the handle assembly has the most direct impact on safety during use. A loose wrap or a cracked wooden core can turn a cutting session into a hazard.

Handle Wrap and Ornaments
The first layer over the wooden core is the Samegawa (ray skin). Its rough, nodular texture adds friction that helps lock the wrap in place and reduce shifting during use. If a katana uses synthetic material instead of real ray skin, check whether the texture still grips the cord firmly.
Over the samegawa goes the Ito (cord wrap), typically made from silk, cotton, or leather. The cord is woven in a crisscross pattern that creates diamond-shaped openings along the handle. Press the diamonds with your thumb when inspecting a sword. If they shift or feel spongy, the wrap is too loose for safe cutting practice.
Small metal figures called Menuki (ornaments) sit tucked under the cord on each side of the handle. They fill the natural hollow of your palm, improving grip comfort.
At each end of the handle, the Fuchi (collar) and Kashira (pommel cap) reinforce the wood and keep it from splitting under repeated impact.
Katana Tang and Pins
The Nakago (tang) is the portion of the blade that extends into the handle. On a properly built katana, the tang runs the full length of the handle. This is called a full tang construction, and it is the only safe design for any sword meant for cutting.
Shortened or welded-on tangs (sometimes called rat-tail tangs) can snap under stress, sending the blade forward. Our guide on full tang katana construction explains why this is the most critical safety feature to verify.

The Mekugi (bamboo pins) pass through holes in both the tang and the wooden handle to lock them together. Bamboo is used because it flexes slightly under impact instead of snapping like metal would. These pins are the primary mechanical fasteners that secure the blade inside the handle, so check their condition before any cutting session.
Collectors pay close attention to the tang for a different reason. The maker’s signature (mei) and file marks (yasurime) on the tang surface help authenticate a sword’s age and origin. Never clean or polish the dark patina on a tang. That oxidation layer is evidence of aging, and removing it destroys the sword’s provenance.
Katana Scabbard Parts
The Saya (scabbard) is traditionally made from lightweight Japanese magnolia wood (honoki), which helps reduce moisture buildup around the blade. A well-fitted saya holds the sword snugly enough to prevent rattling but loosely enough to allow a smooth, one-handed draw.
Where the blade enters, the Koiguchi (mouth) reinforces the opening. It takes the most wear of any scabbard component because the edge passes across it every time you draw or sheathe the sword. A horn or hardwood reinforcement protects this area from being cut by the blade over time.
At the opposite end, the Kojiri (end cap) shields the scabbard tip from impact damage.
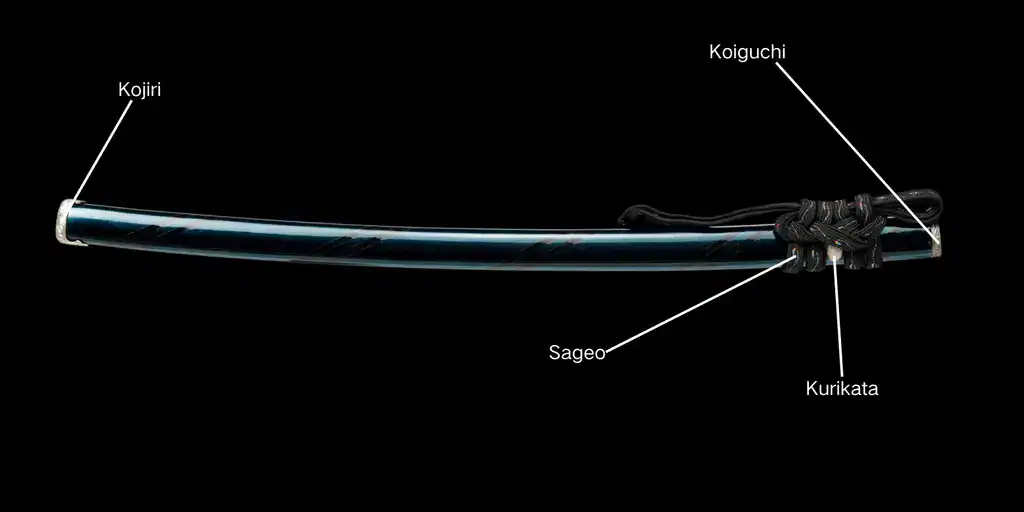
Between these two endpoints, the Kurigata (knob) sits on the outside of the scabbard and anchors the Sageo (cord). The sageo threads through the kurigata and can be tied to the wearer’s belt or obi, keeping the scabbard secure during movement and preventing it from falling.
When the blade is not in use, store it inside the saya in a low-humidity environment. Moisture trapped between the blade and the wood interior is a common cause of rust on an otherwise well-maintained sword. In very humid climates, apply a thin coat of choji oil (clove-based blade oil) before sheathing for long-term storage.
How Knowing Katana Parts Helps You Buy Better
What you inspect first depends on how you plan to use the sword:
- Practitioners (cutting and martial arts): Check the tang construction, mekugi condition, and ito tightness before anything else. These three parts determine whether the sword is safe to swing.
- Collectors: Focus on the hamon pattern, nakago signature, and tsuba craftsmanship. These are the areas where quality and historical value are most visible.
- Display and gift buyers: Look at the saya finish, tsuba design, and ito color. These details define the visual impact when the sword sits on a stand. If you are buying a katana as a gift, prioritize display-ready fittings over cutting performance.
Entry-level functional katanas often start around $100, while hand-forged models with higher-quality fittings can reach $500 or more. Understanding katana anatomy helps you evaluate whether a sword’s price tag matches its build quality.
Knowing the parts of a katana turns a vague product listing into a checklist you can verify before spending money. If you are ready to pick your next sword, our guide on how to choose a katana for practice or display walks through the full decision process.
You can also explore our katana collection to put this knowledge into action.


